Blog

How to Setup Your Lead Capture Page

Posted by:

How to Setup Your Lead Capture Page

New at CLB, if you are an upgraded member, you now have access to create a Lead Capture page to build your list and get new members into CLB.

It’s very simple to setup and I am including instructions and graphics here.

For those with a bit of experience, it will take you about 10 minutes to setup or less! It really is that simple. Our new Lead Capture page uses the GVO auto-responder. If you are not a member of GVO, you can join the affordable Host Then Profit via your CLB Downline Builder. It’s only $9.97 a month and regardless of what other auto-responder you use, you can add this to your resources. You’ll be glad you did 😉

Here are the steps to setup your CLB Lead Capture Page

Login to GVO

http://www.gogvo.com/affiliates

As mentioned above, you need to be a member of GVO or Host Then Profit to set this up.

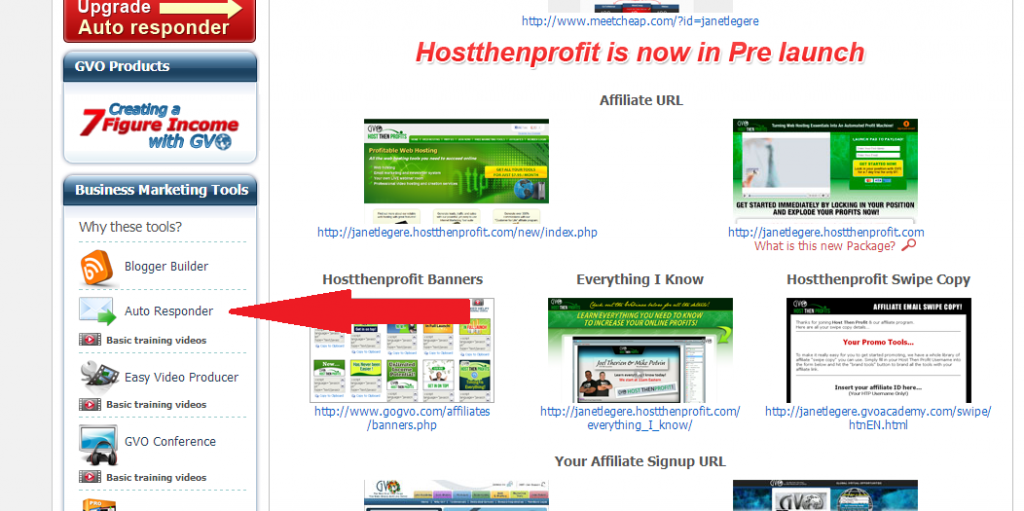
Go to the Auto Responder

autoresponder1

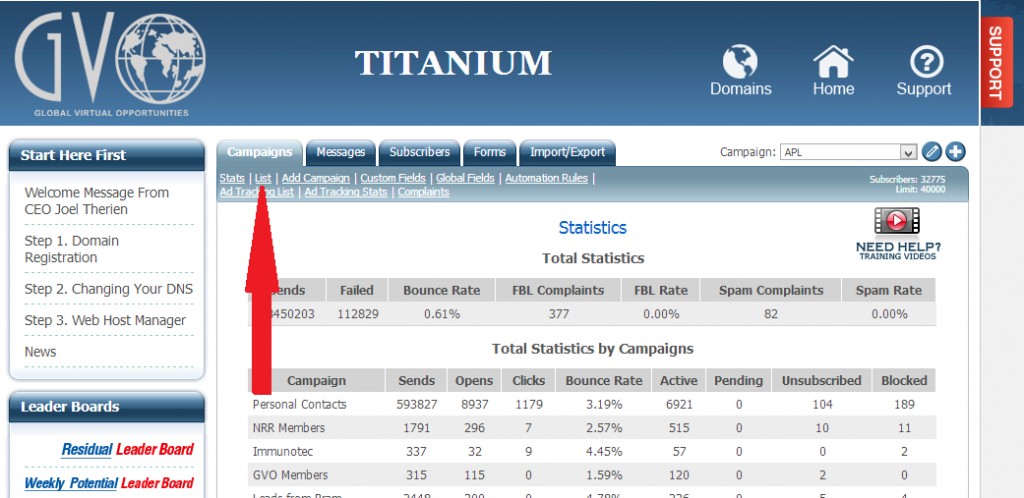
Click on List

autoresponder2

At the bottom of the page you will see two options, one to Copy one to Share

autoresponder3


In the Copy field which is the first one, paste this code 86069c69572A

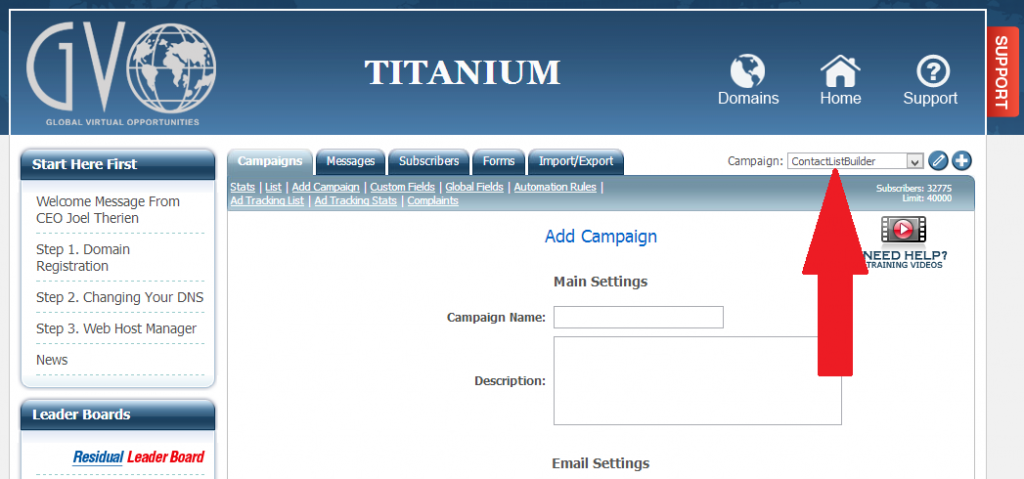
It should create a campaign for Contact List Builder

Make sure your new Campaign is activated

autoresponder5

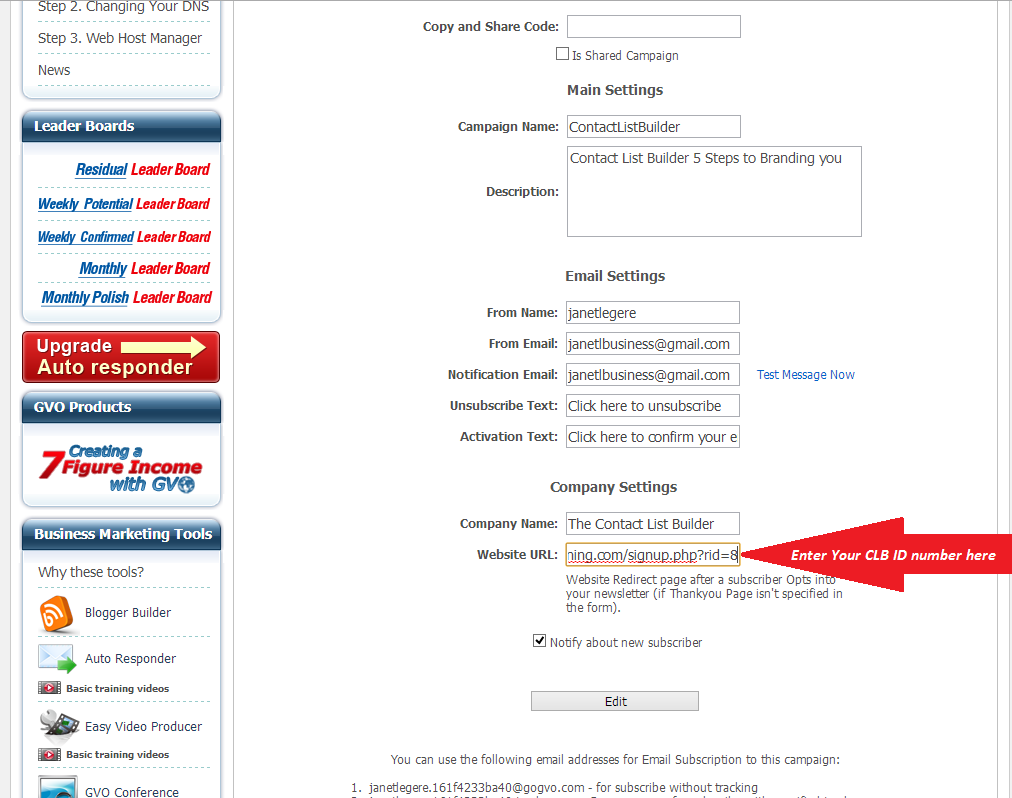
You will need to change the affiliate link on the campaign to your CLB id number – You’ll find it at the bottom of the page it says Contact List builder and has the signup link for CLB.  You need to change the id number at the end

autoresponder4

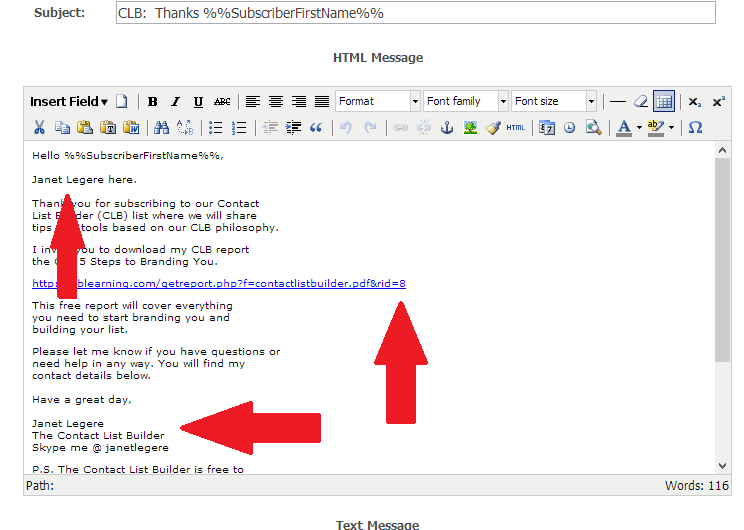
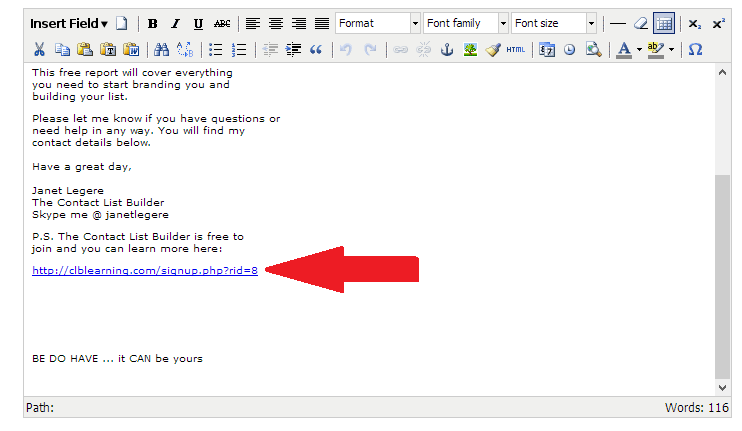
You will need to edit your followup message to change the Name and ID number on the two websites

autoresponder7

autoresponder8

You will need to create a basic form.  You will NOT be using the Form Wizard, just the Create Form feature. The form is THE important part in all this.

autoresponder9

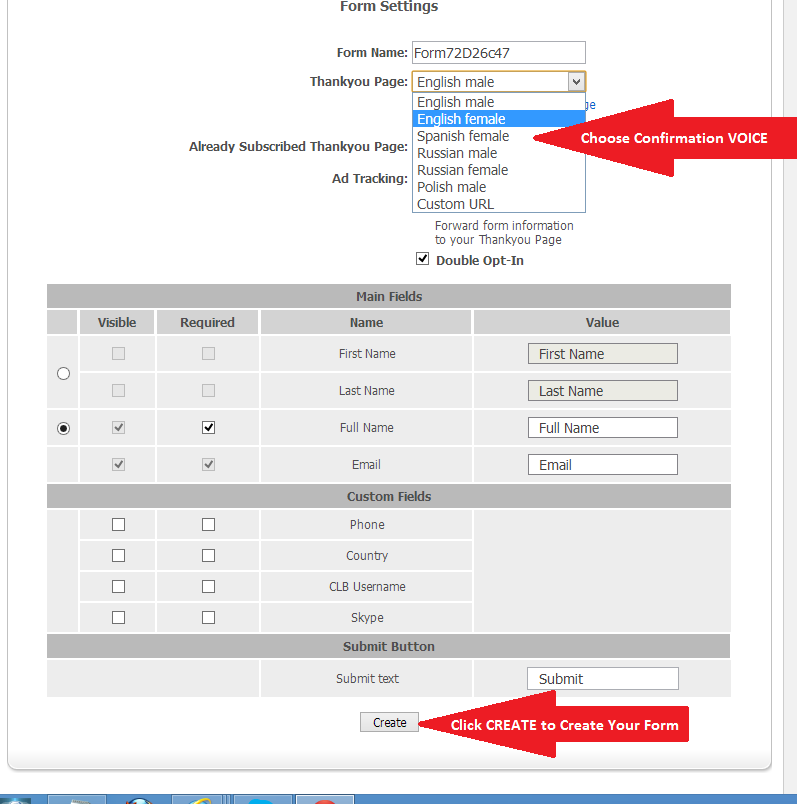
Click on Forms then Create Form accept the default and save it (if you want to choose a different confirmation voice, you can choose from the drop down menu)

autoresponder10

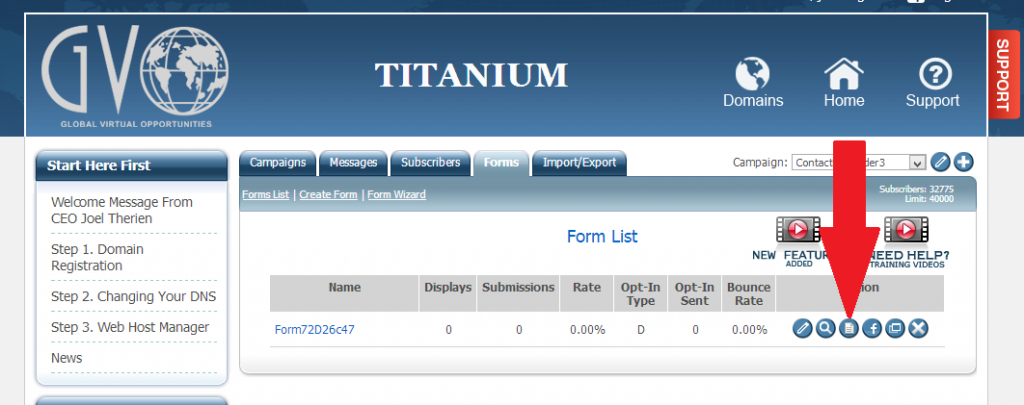
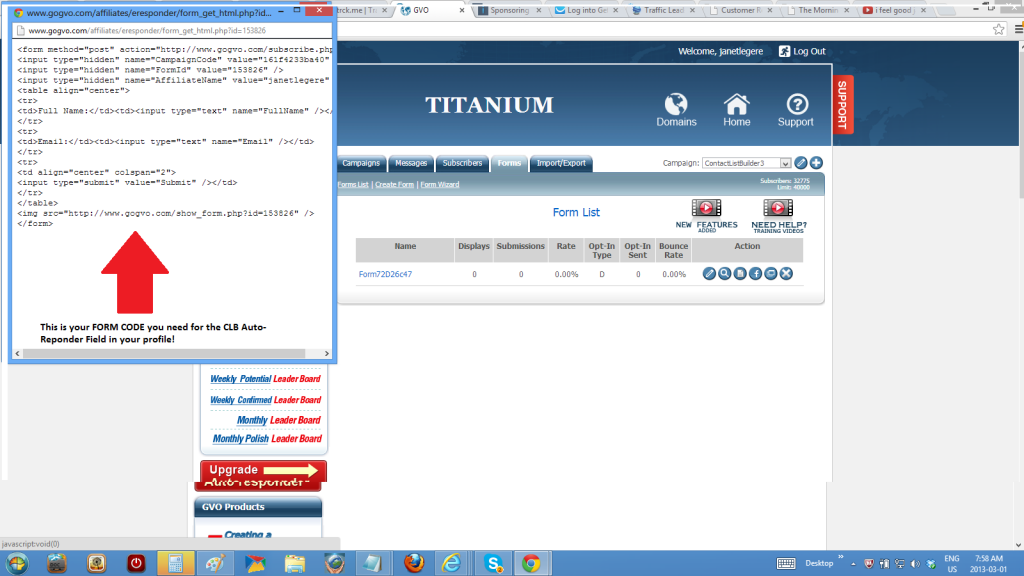
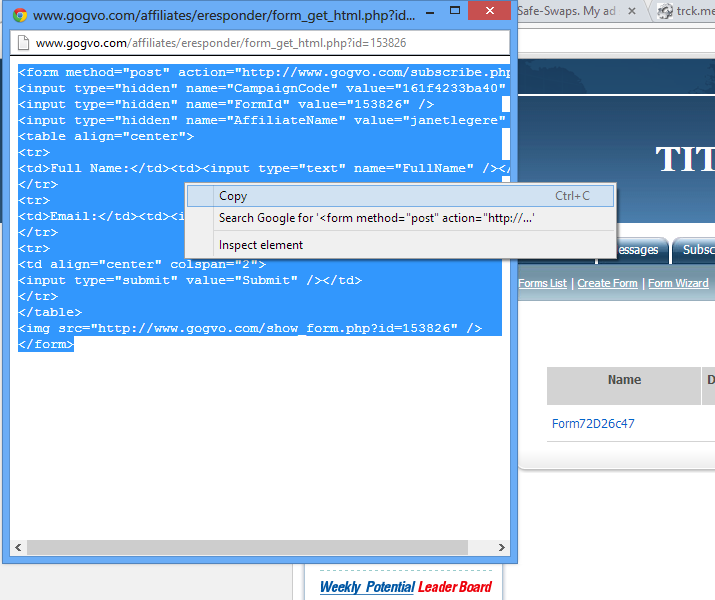
Once your form is created, click on the html icon to get the html code.  Copy the Code.

autoresponder11

autoresponder12

autoresponder13

Login to CLB learning.  www.clblearning.com

autoresponder14

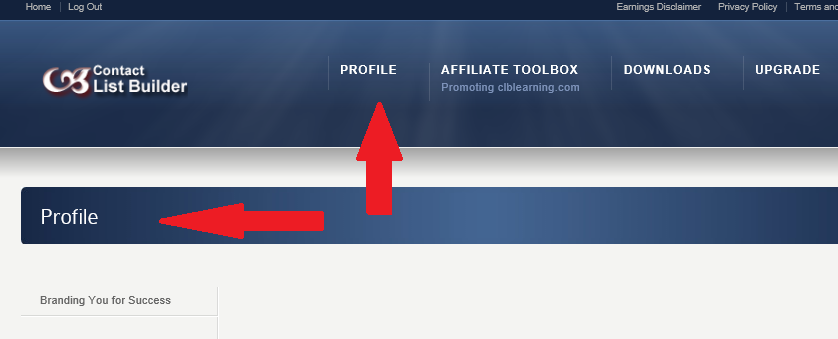
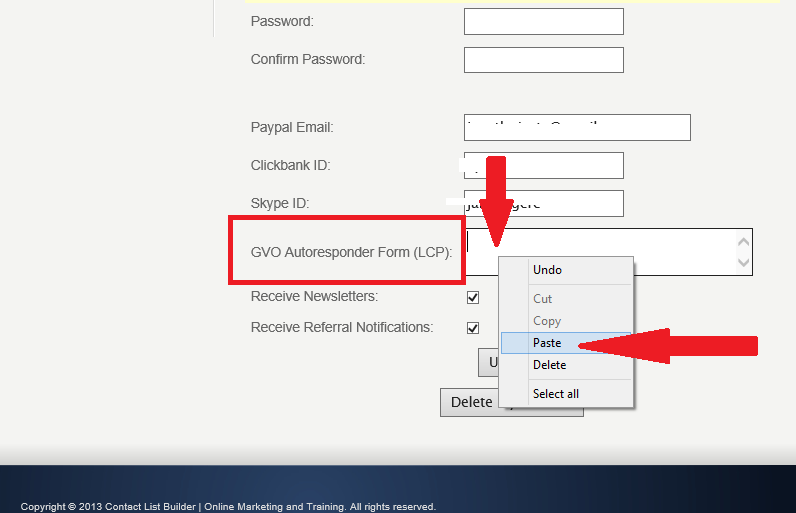
Go to Profile, scroll to the bottom and paste your form code in the new field.

autoresponder15


Click Update

autoresponder16

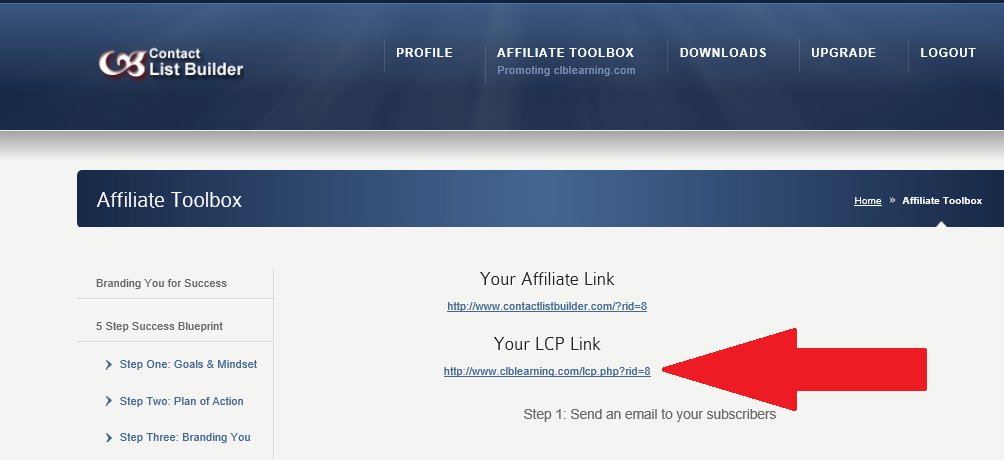
You will find your LCP link listed under Affilaite toolbox

autoresponder18

Here is what your new page will look like

autoresponder19

Be sure to test your page!  Fill out the form, confirm your email.  You should be directed to the CLB Signup page and you should see YOUR name as referrer.

Congratulations!


14
  Related Posts
  • No related posts found.

Comments

  1. Shirley Schwarz (twirlylou)  March 1, 2013

    Thanks Janet,
    This is very complete.
    I believe a newbie can follow this with
    no trouble at all.

    reply
    • Janet Legere  March 3, 2013

      Thanks Shirley, I am glad they are simple as I want everyone to be able to set this up 😉

      reply
  2. Daryl Austman  March 2, 2013

    Even a “salty old dog” like myself got this figured out also Janet… “paint by numbers” simple it is!
    Thanks for the graphical set up steps.
    I even got it done correctly first time around! Hah…

    reply
    • Janet Legere  March 3, 2013

      I love that, you salty old dog you!! Glad you found the instructions simple, that’s what I want to hear 🙂

      Happy Marketing!

      reply
  3. Randy Whitehorne  March 3, 2013

    Easy to follow directions. If you already have your auto responder and campaign set up. Just Log onto the back office click profile scroll down and go to your LCP and copy and paste your HTML code for the campaign

    More owners should be helping like this.

    Great incentive for others to upgrade and bring in new referrals

    reply
    • Janet Legere  March 3, 2013

      Thanks Randy,

      One thing I noticed is that your picture here on your comment is showing an Avatar instead of your picture. I thought this would be a great time to call out to all members who have NOT yet setup Gravatar.

      Go to http://www.gravatar.com and setup your email address attached to your Photo so when you post on a blog the avatar is YOUR picture instead of a character .. this is SO important in branding YOU.

      Small changes can make a BIG difference 😉

      Thanks for all your support and leadership, Randy! We appreciate you

      reply
  4. Jimmie Barber  March 3, 2013

    Nice post! Everything is lined out down to a T. If I am able to make something happen with this, then anyone can! Thanks Janet for having such clear direction on setting up the LCP.

    reply
    • Janet Legere  March 3, 2013

      Glad it helped, Jimmie. I love seeing our members able to make this happen. It’s so exciting!

      reply
  5. paul sloan  March 3, 2013

    Janet what another great Job you have done things are rolling along as usuall at clb please keep up the good work for your members .

    Thanks for all you and Don due and the rest at CLB

    http://www.clblearning.com/lcp.php?id=2484

    reply
    • Janet Legere  March 3, 2013

      Great job Paul!

      My only comment is about your avatar. It’s showing an graphic instead of your picture.

      Go to http://www.gravatar.com and setup your email address attached to your Photo so when you post on a blog the avatar is YOUR picture instead of a character .. this is SO important in branding YOU.

      Small changes can make a BIG difference

      I hope this helps 😉

      Thank you for your continued leadership!

      reply
  6. Anna Loredana  March 4, 2013

    Thanks Janet, never been so easy. I am reconciled with GVO. The path to follow
    was so precise… You are wonderful!

    reply
    • Janet Legere  March 4, 2013

      Nothing makes me smile more than to know I’ve offered help. To know you were able to follow my instructions and make it work is AWESOME! Thanks Anna 🙂

      Now, you want to clean things up and set your avatar to your personal picture so when you post comments, your picture shows instead of an avatar.

      Go to http://www.gravatar.com and setup your email address attached to your Photo so when you post on a blog the avatar is YOUR picture instead of a character .. this is SO important in branding YOU.

      Small changes can make a BIG difference

      See you soon,

      Janet

      reply
  7. Anna Loredana  March 4, 2013

    Thanks Janet for your so precise instructions. It has been really easy.
    This is a proof of the care you have for us.

    reply
  8. Terry Payne  March 5, 2013

    The process gets easier and easier the more a person works at it. The instructions made it a no brainer. Had it up and tested in less than 10. Thanks so much for all you do for us.

    My lcp link: http://www.clblearning.com/lcp.php?id=1891

    reply

Add a Comment